Create new website base on Dynamics AX Enterprise Portal template causes error:
"Unable to connect to Microsoft Dynamics AX. The Dynamics AX Enterprise Portal Tools are not available".
Solutions:
+ Make sure your AOS is running.
+ Make sure your BC connection is configured correctly.
+ If you have AX 4.0 and AX 5.0 in the same box, check the PATH variable to make sure that the path to AX 5.0 bin folder is before AX 4.0.
http://blogs.msdn.com/b/emeadaxsupport/archive/2009/04/24/side-by-side-installation-of-dynamcis-ax-4-0-client-and-dynamics-ax-2009-client.aspx
Visual studio is hang out when you switch from development mode to design mode.
+ If your VS is 2008 and your MS office is 2000, refer to http://blogs.msdn.com/b/mikhailarkhipov/archive/2007/12/14/compatibility-problem-between-vs-2008-and-office-2000-and-how-to-fix-it.aspx
+ If your VS is 2008 and your MS office is 2010, refer to http://blogs.msdn.com/b/webdevtools/archive/2008/10/03/troubleshooting-visual-studion-2008-design-view-hangs-issues.aspx
Monday, 15 November 2010

Friday, 29 October 2010
Utility tool for my daily work
One of my favorite tool is Winmerge!!! I cannot imagine what my life should be without Winmerge. Thanks a lot Winmerge team!!!
Thursday, 9 September 2010
setup security for Axapta
Following is just my draft article to summarize my idea/ experience about how to setup security for AX.
One of the pain point of deploying solution to client is to setup security. The reason is that there is no template in security for different companies.
In order to setup security for Axapta, consultant has to know:
• Company Departments/subsidiaries and who to do what: for ex: manager and his assistant have a right to setup a new discount amount for a item, other member in that department has right to create new sales order (1)
• Company business workflow: The business workflow determines how documents are moving/ transferring between departments. For ex: a sales order can be created/confirmed by Commercial team but the packing slip is done by warehousing team, and the sales invoice is posted by accounting team (2)
As its difficulties, a consultant who setup AX security should to know: (3)
o All information above (1),(2)
o Technical design underneath application: (license code, configuration key, security key, company domain in AX, record level security, field security, tables, menu items,….). In addition, when new modules/ functions are added into AX, the security should take into consideration. It includes (4):
Require new configuration key? If yes, the license purchase from Microsoft should take into consideration, add new configuration key is required
Require new security key? If yes, the license purchase from Microsoft should take into consideration, add new security key is required. If no, which security key will be the parent key for new modules/functions
Security in added code.
So security should take into consider at the first phase as much as possible.
In my opinion technical consultant (that understand buz workflow + has training manual from functional consultant) is a suitable person to setup AX security
So before start to setup AX security, consultant has to:
• Has enough information about (1), (2): requisition
• Has knowledge about (3)
• Good design/documents about (4)
Best practice for AX security setup:
• Define domain.
• Turn configuration key on/off
• Setup access level for parent key
• Disable unnecessary features/forms by using security keys
• Turn on features that are going to be used
How to test security?
One of the first idea comes out is that we add a test user account in to AX system and login a workstation to test.There are not such tools to test it automatically at this moment. To save time we can reate a new user account, assign user to a member group and test manually. By using runas command we can setup and test in the same PC.
Enjoy!!!
One of the pain point of deploying solution to client is to setup security. The reason is that there is no template in security for different companies.
In order to setup security for Axapta, consultant has to know:
• Company Departments/subsidiaries and who to do what: for ex: manager and his assistant have a right to setup a new discount amount for a item, other member in that department has right to create new sales order (1)
• Company business workflow: The business workflow determines how documents are moving/ transferring between departments. For ex: a sales order can be created/confirmed by Commercial team but the packing slip is done by warehousing team, and the sales invoice is posted by accounting team (2)
As its difficulties, a consultant who setup AX security should to know: (3)
o All information above (1),(2)
o Technical design underneath application: (license code, configuration key, security key, company domain in AX, record level security, field security, tables, menu items,….). In addition, when new modules/ functions are added into AX, the security should take into consideration. It includes (4):
Require new configuration key? If yes, the license purchase from Microsoft should take into consideration, add new configuration key is required
Require new security key? If yes, the license purchase from Microsoft should take into consideration, add new security key is required. If no, which security key will be the parent key for new modules/functions
Security in added code.
So security should take into consider at the first phase as much as possible.
In my opinion technical consultant (that understand buz workflow + has training manual from functional consultant) is a suitable person to setup AX security
So before start to setup AX security, consultant has to:
• Has enough information about (1), (2): requisition
• Has knowledge about (3)
• Good design/documents about (4)
Best practice for AX security setup:
• Define domain.
• Turn configuration key on/off
• Setup access level for parent key
• Disable unnecessary features/forms by using security keys
• Turn on features that are going to be used
How to test security?
One of the first idea comes out is that we add a test user account in to AX system and login a workstation to test.There are not such tools to test it automatically at this moment. To save time we can reate a new user account, assign user to a member group and test manually. By using runas command we can setup and test in the same PC.
Enjoy!!!
Monday, 26 April 2010
Display Inventory onhand in Sales order line

Rquirement: to display inventory on- hand in sales line.
Solution:
-Add a new method into SalesLine datasource:
//BP Deviation documented
display inventQty availPhysical(SalesLine _SalesLine)
{
InventOnhand InventOnhand;
InventDimParm inventDimParm;
;
if (inventDim.configId != '')
inventDimParm.ConfigIdFlag = NoYes::Yes;
if (inventDim.inventBatchId != '')
inventDimParm.InventBatchIdFlag = NoYes::Yes;
if (inventDim.InventColorId != '')
inventDimParm.InventColorIdFlag = NoYes::Yes;
if (inventDim.InventLocationId != '')
inventDimParm.InventLocationIdFlag = NoYes::Yes;
if (inventDim.inventSerialId != '')
inventDimParm.InventSerialIdFlag = NoYes::Yes;
if (inventDim.InventSiteId != '')
inventDimParm.InventSiteIdFlag = NoYes::Yes;
if (inventDim.InventSizeId != '')
inventDimParm.InventSizeIdFlag = NoYes::Yes;
if (inventDim.wMSLocationId != '')
inventDimParm.WMSLocationIdFlag = NoYes::Yes;
if (inventDim.wMSPalletId != '')
inventDimParm.WMSPalletIdFlag = NoYes::Yes;
InventOnhand =
InventOnhand::newParameters(_salesLine.ItemId,
_salesLine.inventDim(),
inventDimParm);
return inventOnHand.availPhysical();
}
-Customize modified method of inventdim's fields datasource :
public void modified()
{
SalesLine salesLineFind;
super();
salesLine.modifyItemDim(inventDim,fieldnum(InventDim,InventBatchId),InventTable::find(salesLine.ItemId).DimGroupId);
if (salesLine.DeliveryDateControlType)
SalesCalcAvailableDlvDates::modifiedField(salesLine,0,false,false,inventDim);
// finds the current selected sales line
salesLineFind = SalesLine::find(salesLine.SalesId, salesLine.LineNum);
// syncs sales table with db
salesLine_ds.research();
// updates table ui
salesLine_DS.reread();
// finds the current selected sales line
salesLine_ds.findRecord(salesLineFind);
}
-Add a Real field into SaleLine grid with display method is set to the method created in step 1.
Enjoy!
Friday, 6 March 2009
Helpful Purchase Order and Sales order info
When working with a client, and doing data imports of their data into the new Ax instance you might have to bring in open purchase orders or sales orders. The great thing about this is that both of these are very similar in how they function, look, act, etc. One of the key things to understand when bringing in, for example, purchase orders is the Quantity tab and the data that lives there. The easiest peice about this is the actual Quantity or Purchase Quantity. The thing to keep in mind here when mapping and filling this field with data, is that in reality it's two fields: QtyOrdered, PurchQtyThis is a key peice of data that you must first fill to build everything in the Quantity tab from. The next field that needs to be explained and understood is the Deliver Remainder field on the Qty tab. This field specifys how much of the purchase qty is left to be delivered to the specified delivery address. As long as there is data in this field then the given purchase order is still marked as Open. This field, is actually two fields in the table: RemainInventPhysical, RemainPurchPhysicalOur next field to look at is the Invoice Remainder. This field tells you how much of the purchase qty, that has been recieved, but not yet been invoiced. This field is actually one field called: RemainPurchFinancial.The next two fields we are going to talk about is the Invoiced and Recieved fields in the tab. These fields are actual not fields in the PurchLine database, but rather are driven from Display methods off of the PurchLine Table itself. These display methods are called: Recieved = PurchLine.receivedInTotal(), Invoiced = PurchLine.invoicedInTotal(). What you need to keep in mind here is that these fields are acutally built off of the vendPackingSlipTrans table (Recieved) and the vendInvoiceTrans table (Invoiced). These tables must have values in them, as they represent actual receiving actions doen to the given purchase order line, and invoicing done. This is something that can be tricky, and must be done correctly, as if done wrong you can have incorrect data in these two tables that can cause reports to be off, etc. A lot of people / companies at this point decide to back out of the recieved and invoiced values and then for each open PO, redo these actions from within axapta in order to make sure all reporting and values are accurate and percise to maintain data integrity. The last field we will review, which happens to be the first field in the tab is the Recieve Now field. This field, when supplied with a value, can be used to mark a given qty for the specified line, during a packing slip update to be marked as recieved. Now we can go further into the details of this and how each field pertains to different actions, etc. What most important to understand is this base knowledge though and from there build upon that during your use of Ax. To Re-cap below is a list of these Field names, and then there actual field name in the table. Also I have included the logic for how Ax determines the status of a given PO or SO:1. Quantity = PurchLine.QtyOrdered, PurchLine.PurchQty2. Deliver Remainder = PurchLine.RemainInventPhysical, PurchLine.RemainPurchPhysical3. Invoice Remainder = PurchLine.RemainPurchFinancial4. Invoiced = PurchLine.invoicedinTotal() [Display Method]5. Recieved = PurchLine.recievedInTotal() [Display Method]Status Logic:If anything exists in the Deliver Remainder then the PO is open.If Nothing exsists in the Deliver Remainder, and all Qty Ordered exist in the Recieved then the PO is recievedIf all qty has been recieved, and all has been invoiced, then the PO is invoiced.
P/S: There is a bug in Axapta which will be fixed if you know above useful information!!!
P/S: There is a bug in Axapta which will be fixed if you know above useful information!!!
Sunday, 4 January 2009
New year, new HOPES
A new year is comming and our real works with Microsoft is come true!!!!
Last Friday, I sent an email to Dynamics Axapta Build team to ask them about our license in Axapta. And out of my supprise, the replied my email quickly. I really appreciate their helps and I also know that right now our new hard challenges is comming too. I like challenge!!!
Our main duties with Microsoft is Axapta bug fixing.
Last Friday, I sent an email to Dynamics Axapta Build team to ask them about our license in Axapta. And out of my supprise, the replied my email quickly. I really appreciate their helps and I also know that right now our new hard challenges is comming too. I like challenge!!!
Our main duties with Microsoft is Axapta bug fixing.
Wednesday, 17 September 2008
Windows Test Technicque For Axapta
Last weeks, I recevied some resources from our Ukraine about Test Automation. It's called WTT. Unfortunately, we didn't understand what it is about. We just read the document and we was really in a circle. Where could we start? What is the first step to deal with Axapta Test Automation?
It were hard questions for me because I never deal with test automation before. (I just know UniTest)
But, lucky me, my dear friend Danang sent us videos to demonstrate how to deal with WTT.
Right now, with all of our Celenia Vietnam mates, I think we are ready for implementing real testcase.
I also hope that we will deal with Axapta 2009 as much as possible.
Monday, 28 July 2008
Create an Axapta page on Facebook
Today, i have created an Axapta page on facebook. I hope this page will help us easier to share our knowledge.
Tuesday, 15 July 2008
10 tips for debugging in Dynamics Ax
Fixing bugs requires quite a bit of experience and knowledge of the modules involved, both on a technical and functional level. The first step to fix something is to find the cause of the problem, a.k.a. debugging.
You shouldn’t limit yourself to using the debugger when things go wrong. Debugging can help you understand the system. I often fire up the debugger just to see what happens in a standard application. This helps me to see how modifications can be implemented and what the consequences are. Dynamics is too big and too complex to be able to just dive in and change something.
Here are some tips to help you in the fine art of debugging. Some might be blatantly obvious to experienced developers. These are things I wish I had known when I first started working with Axapta.
Assume you broke it
This is probably the most important advice. We developers tend to think we write good code. Some of us do, some of us don’t. But nobody does it flawlessly. By default, assume anything you didn’t write yourself works perfectly. This narrows down the search considerably. After careful debugging you may come to a different conclusion. In which case you’ll have a good bug report to file.
If a system has been running fine for a while and it suddenly breaks down after importing new code, those changes are likely to be the root cause of the problem. Try reverting your changes and doing the exact same thing. If the problem remains, you have found an unrelated problem. If not, you know where to start looking for errors.
Get a clear description of the problem
Unless the error is clear enough and you immediately know how to fix it, you’ll need a detailed description how to trigger this error. Unfortunately this can be very hard. Getting users to tell you exactly what you need to understand a bug isn’t that simple. Keep in mind that users are generally not interested in the program they’re using. They just want to get their job done. They have been taught to use the system in a certain way and unexpected errors confuse them. They might not realize what’s different when things go wrong compared to when everything just works.
You need to ask the right questions. If necessary sit next to them and watch them work. Take notes and try to notice special cases. And don’t forget to ask what the correct behaviour should be. There may be no error message and whatever happens may look correct but the user could be expecting a different result.
Without a good scenario it may be impossible to solve some bugs.
Don’t worry to much about errors that only occur once
If something goes wrong only once and it doesn’t happen again, don’t worry too much about it. Depending on the risk it may be better to fix the damage and move on. There’s probably a bug lurking somewhere but you have to decide if it’s worth chasing it.
Intercept error messages
Anything sent to the info log window passes through the add() method on the Info class. Put a breakpoint there if you want to know where a message is triggered. Using the stack trace in the debugger it’s usually not that hard to see which conditions cause it.
Often it turns out to be a missing setting in one of the basic tables.
Intercept data modifications
Not all bugs come with an easy to intercept error message. Sometimes all you get is bad data. It’s possible to see when and why records are created, modified or deleted by putting breakpoints in insert(), update() or delete() on a table. Create them if necessary. Just being able to look at the stack in the debugger when these are called can be very insightful.
Remember that it is possible to modify data without passing through these methods. Like using doInsert(), doUpdate() or doDelete(), or using direct SQL. It’s not very common but sometimes you can miss something.
Intercept queries
If you suspect a query is not correct you’ll want to verify its output. A way that doesn’t require much work is using the postLoad() method. It can be overridden on each table and is called for each selected record. It even works with complex joins. Putting an info() in the postLoad() of each table in a query can tell you a lot about what’s happening.
The cross-reference is your friend
The cross-reference is one of the most important tools when developing and debugging in Dynamics Ax. Always try to have an environment somewhere with an updated cross-reference (not the live environment). You can find the cross-reference in the development tools menu.
Need to know where a field gets its value? The cross-reference tells you where every read and write happens.
Want to know where an error message is used? Open the label editor and find the label, then click the Used By button.
Set up a separate environment
When dealing with complex problems it helps to have a separate environment for debugging. This allows you to freely modify code and data without affecting the live system. This is very important when you have to post invoices or do anything else that is basically irreversible.
It also prevents live users from being blocked if you have breakpoints in the middle of a transaction.
Dealing with large datasets
Sometimes a problem can only be reproduced in (a copy of) the live environment. You’re often stuck with a lot of data that doesn’t matter but gets in the way. Like when you need to debug the MRP. Using regular breakpoints doesn’t help because it takes too long before you get to the real issue.
In this case you need to have some more tricks up your sleeve to narrow down the search. One option is to work in several passes. Using the cross-reference determine places where something interesting happens and dump data with info() or Debug::printDebug(). This should narrow down the possible suspects. With a bit of luck just looking at the data can be enough to identify the problem.
Another way is implementing your own conditional breakpoints. The debugger doesn’t offer these out of the box but you can roll your own with an if-statement and the breakpoint statement. This is very effective if you have some more or less unique identifier of the problem, like a record ID or a customer account or even a date.
Clean up
Don’t forget to remove any modifications you made while debugging. You probably don’t want to leave a hardcoded breakpoint in a live system. Been there, done that, very annoying.
Good luck hunting for bugs.
Feel free to share your debugging techniques.
Install Axapta 3.0 SP5,SP6
Last week i tried to install Axapta 3.0 into my computer and it took me more than one day to finish. I was so tired but actually I got some good experience in setup Axapta. In my opinion, here are steps to install Axapta.
- Install SQL server. I just used SQL server 2005 version.
- Install Axapta 3.0.
- Update your Axapta client to kernel rollup 2.If you are planning to upgrade to SP6 you don't need to update to kernel rollup 2.
- Install SP5 or SP6 as needed.
- Setup Connection from Axapta server to SQL server by using ODBC connection or SQL server as needed
Monday, 17 March 2008
Lookup Form
Axapta usually creates required lookup forms on the fly, but it also allows the developer to create a custom lookup form and assign it as "FormHelp" to an extended datatype, so that it is automatically used. Why would you do that? There might be many reasons. Typically you need to display the data in a non standard order or you want to show only a subset of the data depending on some criteria. Here are the steps needed to create a proper lookup form.
Contents
* 1 Assumptions
* 2 Create the form
* 3 Make it selectable
* 4 Make sure the form opens with the previously selected value
* 5 Make lookup react to search by wild card
* 6 Make Form Default lookup for an Extended Data Type
Assumptions
In the following example I assume you create a lookup for table "xyz" and the ID field of that table is called "id".
Create the form
First create a basic form. Usually this form contains not much more than a grid. But you might add additional controls. Then set the following properties on the datasource, so that the form can not be used for editing:
AllowCheck: No
AllowCreate: No
AllowDelete: No
AllowEdit: No
AutoNotify: No
InsertAtEnd: No
InsertIfEmpty: No
Additionally set for the design the following properties to make it look like a proper lookup:
AlwaysOnTop: Yes
Frame: Border
HideToolbar: Yes
WindowType: Popup
[edit] Make it selectable
Now we need to tell the lookup form, which control will return the selected value. Lets assume you have a form with a grid and in that grid you have a control called "xyz_id". In this case you overwrite the init method of the form as shown below. Note that if you are using Axapta v3.0 or higher, then you can set the control's AutoDeclaration property to Yes and use the control name directly in the selectMode() call.
public void init()
{
FormControl xyz_id;
;
super();
xyz_id= element.design().control(control::xyz_id);
element.selectMode(xyz_id);
}
[edit] Make sure the form opens with the previously selected value
Strange enough the following is missing in most/all custom lookup forms, which you find in Axapta Standard. But it is required, if you want your lookup to mark the previously selected value as active record. Therefore overwrite the ExecuteQuery method of your datasource:
public void executeQuery()
{
FormStringControl callerControl = SysTableLookup::getCallerStringControl(element.args());
;
super();
xyz_ds.findValue(fieldnum(xyz,id),callerControl.text());
}
With a lot of pain I had top learn that the above will not work, if you use the standard query, which is automatically created by Axapta. This might be due to existing Dynalinks or other reasons, which I am not aware of. But it will work fine, if you create your own query for example in the Init method of the datasource. Here you can also define your custom sort or range criteria:
public void init()
{
Query q = new Query();
QueryBuildDataSource qbds;
;
super();
qbds = q.addDataSource(tablenum(xyz));
qbds.orderMode(OrderMode::OrderBy);
qbds.addSortField(fieldNum(xyz,some_other_field));
this.query(q);
}
[edit] Make lookup react to search by wild card
The following you will find in the official documentation and also in a lot of Axapta examples. If you type in a standard Axapta StringEdit Control something like "abc*", then automatically the lookup will open and only the matching subset of records will be shown. You achieve this by overwriting the run method of the form:
public void run()
{
FormStringControl callerControl = SysTableLookup::getCallerStringControl(element.args());
Boolean filterLookup = false;
;
// if lookup was called with filter, then supress autoSearch
if (callerControl.text() && callerControl.hasChanged())
{
filterLookup = true;
xyz_ds.autoSearch(false);
}
super();
// after call of super filter search manually by applying past filter
if (filterLookup)
{
xyz_ds.research();
xyz_ds.filter(fieldnum(xyz,id),callerControl.text());
}
}
Make Form Default lookup for an Extended Data Type
To have Axapta use your form by default every time a lookup is performed, you can set your form's name in the Extended Data Type's property called 'FormHelp'. You do not necessarily need a display menu item, the property is your actual form's name.
So that's it. Now you have a wonderfully working custom lookup.
Contents
* 1 Assumptions
* 2 Create the form
* 3 Make it selectable
* 4 Make sure the form opens with the previously selected value
* 5 Make lookup react to search by wild card
* 6 Make Form Default lookup for an Extended Data Type
Assumptions
In the following example I assume you create a lookup for table "xyz" and the ID field of that table is called "id".
Create the form
First create a basic form. Usually this form contains not much more than a grid. But you might add additional controls. Then set the following properties on the datasource, so that the form can not be used for editing:
AllowCheck: No
AllowCreate: No
AllowDelete: No
AllowEdit: No
AutoNotify: No
InsertAtEnd: No
InsertIfEmpty: No
Additionally set for the design the following properties to make it look like a proper lookup:
AlwaysOnTop: Yes
Frame: Border
HideToolbar: Yes
WindowType: Popup
[edit] Make it selectable
Now we need to tell the lookup form, which control will return the selected value. Lets assume you have a form with a grid and in that grid you have a control called "xyz_id". In this case you overwrite the init method of the form as shown below. Note that if you are using Axapta v3.0 or higher, then you can set the control's AutoDeclaration property to Yes and use the control name directly in the selectMode() call.
public void init()
{
FormControl xyz_id;
;
super();
xyz_id= element.design().control(control::xyz_id);
element.selectMode(xyz_id);
}
[edit] Make sure the form opens with the previously selected value
Strange enough the following is missing in most/all custom lookup forms, which you find in Axapta Standard. But it is required, if you want your lookup to mark the previously selected value as active record. Therefore overwrite the ExecuteQuery method of your datasource:
public void executeQuery()
{
FormStringControl callerControl = SysTableLookup::getCallerStringControl(element.args());
;
super();
xyz_ds.findValue(fieldnum(xyz,id),callerControl.text());
}
With a lot of pain I had top learn that the above will not work, if you use the standard query, which is automatically created by Axapta. This might be due to existing Dynalinks or other reasons, which I am not aware of. But it will work fine, if you create your own query for example in the Init method of the datasource. Here you can also define your custom sort or range criteria:
public void init()
{
Query q = new Query();
QueryBuildDataSource qbds;
;
super();
qbds = q.addDataSource(tablenum(xyz));
qbds.orderMode(OrderMode::OrderBy);
qbds.addSortField(fieldNum(xyz,some_other_field));
this.query(q);
}
[edit] Make lookup react to search by wild card
The following you will find in the official documentation and also in a lot of Axapta examples. If you type in a standard Axapta StringEdit Control something like "abc*", then automatically the lookup will open and only the matching subset of records will be shown. You achieve this by overwriting the run method of the form:
public void run()
{
FormStringControl callerControl = SysTableLookup::getCallerStringControl(element.args());
Boolean filterLookup = false;
;
// if lookup was called with filter, then supress autoSearch
if (callerControl.text() && callerControl.hasChanged())
{
filterLookup = true;
xyz_ds.autoSearch(false);
}
super();
// after call of super filter search manually by applying past filter
if (filterLookup)
{
xyz_ds.research();
xyz_ds.filter(fieldnum(xyz,id),callerControl.text());
}
}
Make Form Default lookup for an Extended Data Type
To have Axapta use your form by default every time a lookup is performed, you can set your form's name in the Extended Data Type's property called 'FormHelp'. You do not necessarily need a display menu item, the property is your actual form's name.
So that's it. Now you have a wonderfully working custom lookup.
Wednesday, 12 March 2008
Dynamics AX 4.0 Meta Model
If you are a new developer and is trying to ramp up on AX, this might be a post for you. In MorphX (the IDE for AX) you do model-driven development. This basically means you create new elements of certain concepts, decorate them with properties, and wire them all together. Naturally there will be requirements to your features that cannot be expressed in the model, in these cases you have to resort to writing X++ code.
Let's return to modeling. In the AOT (Application Object Tree) you will find a lot of modeling concepts, such as Forms, Tables, Extended Data Types etc. The AOT is quite good as a dictionary of concepts, but how do they relate? For Inside Dynamics AX 4.0 we created the below overview diagrams to answer this question. After the book has been through editing the diagrams were chopped up. This gives a better details view, but the overview was lost. But not anymore. :-)
Read each arrow as "using". For example. A Menu uses Menu Items. A Menu Item uses a Form. A Form uses a Table. A Table uses Extended Data Types. And so on.
I've attach a Microsoft Office Visio version of the diagrams to this post as well for your convenience.
The win client version:
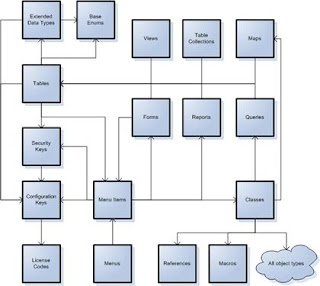
The web client version:
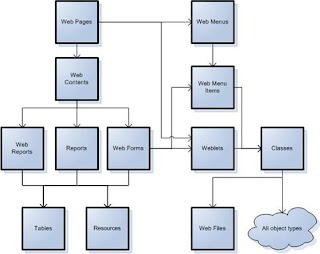
Let's return to modeling. In the AOT (Application Object Tree) you will find a lot of modeling concepts, such as Forms, Tables, Extended Data Types etc. The AOT is quite good as a dictionary of concepts, but how do they relate? For Inside Dynamics AX 4.0 we created the below overview diagrams to answer this question. After the book has been through editing the diagrams were chopped up. This gives a better details view, but the overview was lost. But not anymore. :-)
Read each arrow as "using". For example. A Menu uses Menu Items. A Menu Item uses a Form. A Form uses a Table. A Table uses Extended Data Types. And so on.
I've attach a Microsoft Office Visio version of the diagrams to this post as well for your convenience.
The win client version:

The web client version:

Temporary tables in Axapta
Temporary tables are used for non-persistent storage in Microsoft Axapta.
They are useful in two common situations
1. As the datasource for a form or report, where the original data is too complex to be easily queried.
2. As temporary storage during complicated processing, to hold the results midway through the process.
Contents
[hide]
* 1 Scoping rules for temporary tables
* 2 Creating temporary tables
o 2.1 In the AOT
o 2.2 Making an existing table temporary
* 3 Temporary tables in forms
* 4 Temporary tables in reports
* 5 Temporary table performance
* 6 Indexes on temporary tables
* 7 Security on temporary tables
* 8 Database transactions (tts) on temporary tables
[edit] Scoping rules for temporary tables
In general, each instance of a temporary table, and it's associated data, will only exist while the buffer variable used to access it is in scope.
You can point multiple buffer variables to the same instance of a temporary table by using either the .setTmpData() method or by directly assigning the buffers to each other, identically to normal tables. In this way, even if your original buffer variable goes out of scope, your data will be retained while one of the other referencing variables remains.
Be aware that static table methods - such as find() - will not work with temporary tables unless you pass through the buffer variable to the method.
For example, this method will not work on a temporary table, as the tempTable variable used is newly created and will always contain no records.
// This won't work on temporary table
public static TempTable find(AccountNum _accountNum, boolean _forUpdate = false)
{
TempTable tempTable;
;
if (_accountNum)
{
tempTable.selectForUpdate(_forUpdate);
select firstonly tempTable
where tempTable.AccountNum == _accountNum;
}
return tempTable;
}
If you want to have a find() method on your temporary table, then you will need to modify it slightly to pass through a reference to our populated temporary table.
// Use this pattern instead
public static TempTable find(AccountNum _accountNum, TempTable _tempTable, boolean _forUpdate = false)
{
if (_accountNum)
{
_tempTable.selectForUpdate(_forUpdate);
select firstonly _tempTable
where _tempTable.AccountNum == _accountNum;
}
return _tempTable;
}
Some examples of populating and using temporary tables can be found in Image:TRG TempTablesGeneral.xpo project.
[edit] Creating temporary tables
[edit] In the AOT
Set the Temporary property to Yes to create a table which will always be temporary.
Note that any existing data will be permanently deleted if you do this!
Of course, you can no longer use the Table Browser to check the data, as the data is stored only per scoped instance of this table.
[edit] Making an existing table temporary
You can convert a normal table to a temporary table in code. For example, if you wish to create a temporary copy of the inventory table:
InventTable inventTable;
;
inventTable.setTmp();
Doing so will remove all data from the temporary copy of the table. If you wish to create a populated temporary copy of a standard table, you can do the following:
InventTable inventTable;
InventTable inventTableTmp;
;
inventTableTmp.setTmp();
while select inventTable
{
inventTableTmp.data(inventTable.data());
inventTableTmp.doInsert();
}
You can now add, modify or delete data from the table without affecting the real contents stored in the database.
[edit] Temporary tables in forms
Using temporary tables in forms requires the use of the .setTmpData() method.
For example:
The temporary table data is populated in a static class method (running server side), which is called from the form and returns the populated table. We could populate a form-level buffer with the temporary data if needed, or else just call the populating method directly from the setTmpData() call as shown below.
In the form datasource init(), we use .setTmpData() to instruct the datasource query to use our temporary table. Our datasource name in this example is TempTable.
public void init()
{
super();
TempTable.setTmpData(tmpTableClass::populateTmpData());
}
See Image:TRG TempTablesForm.xpo for an example of a working form based on a temporary table.
It is also possible to add a table to a form which is not a temporary table, but the data that is shown must be temporary. Compared to the previous example there are not a lot of changes; just make sure the table is made temporary using .setTmp(). As in the previous example the temporary table data is populated in a static class method (running server side), which is called from the form and returns the populated table.
In the following example the InventTable is used.
public void init()
{
super();
InventTable.setTmp();
InventTable.setTmpData(InventTableClass::populateTmpData());
}
[edit] Temporary tables in reports
The correct method of using temporary tables in reports is slightly different from that of forms.
The most important difference is the use of .setRecord() instead of .setTmpData(). A simple example follows:
public boolean fetch()
{
boolean ret;
;
this.queryRun().setRecord(tmpTableClass::populateTmpData());
ret = super();
return ret;
}
As there is often already a supporting RunBaseReport class being used to run the report, it is easy to integrate the population of the temporary data into that existing class. This is particularly useful if you need the data in the temporary table to be dependent on information entered into the report dialog prompt by the user.
See Image:TRG TempTablesReports.xpo for an example of using a RunBaseReport class to run a report based on a temporary table.
[edit] Temporary table performance
Data being stored in temporary tables is stored in a temporary physical file in the file system. The file itself is created when the first record is being inserted in that particular instance of the temporary table. Hence, in a 3 tier environment, the file will be maintained on server or client side, depending on where the first record is inserted. From a performance standpoint this is a concern when using temporary tables.
[edit] Indexes on temporary tables
As with normal tables, indexes can be created on temporary tables. When a temporary copy of a normal table is used with .setTmp(), then the existing indexes will also be created on the temporary version. For new temporary tables (with the Temporary property set to Yes), you must create any desired indexes through the AOT in the normal way.
Indexes have a substantial effect on temporary table performance. For temporary tables with a lot of records you will experience major performance limitations when searching on non-indexed fields.
[edit] Security on temporary tables
You can assign a SecurityKey to a temporary table, like any other. The security key will work well, limiting access. However, temporary tables never show up in the tree for assigning permissions, so it's not possible to actually enable them for users. Therefore it's important not to put a security key on any temporary table or users will never be able to use it.
[edit] Database transactions (tts) on temporary tables
Temporary tables are not included in Dynamics Ax's normal transaction processing capabilities. If you include population of a temporary table inside a ttsBegin/ttsCommit which then aborts, changes made to the temporary table will not be aborted.
To activate transaction capabilities on temporary tables, use the local ttsBegin and ttsCommit methods on the temporary table buffer themselves. These work as expected.
They are useful in two common situations
1. As the datasource for a form or report, where the original data is too complex to be easily queried.
2. As temporary storage during complicated processing, to hold the results midway through the process.
Contents
[hide]
* 1 Scoping rules for temporary tables
* 2 Creating temporary tables
o 2.1 In the AOT
o 2.2 Making an existing table temporary
* 3 Temporary tables in forms
* 4 Temporary tables in reports
* 5 Temporary table performance
* 6 Indexes on temporary tables
* 7 Security on temporary tables
* 8 Database transactions (tts) on temporary tables
[edit] Scoping rules for temporary tables
In general, each instance of a temporary table, and it's associated data, will only exist while the buffer variable used to access it is in scope.
You can point multiple buffer variables to the same instance of a temporary table by using either the .setTmpData() method or by directly assigning the buffers to each other, identically to normal tables. In this way, even if your original buffer variable goes out of scope, your data will be retained while one of the other referencing variables remains.
Be aware that static table methods - such as find() - will not work with temporary tables unless you pass through the buffer variable to the method.
For example, this method will not work on a temporary table, as the tempTable variable used is newly created and will always contain no records.
// This won't work on temporary table
public static TempTable find(AccountNum _accountNum, boolean _forUpdate = false)
{
TempTable tempTable;
;
if (_accountNum)
{
tempTable.selectForUpdate(_forUpdate);
select firstonly tempTable
where tempTable.AccountNum == _accountNum;
}
return tempTable;
}
If you want to have a find() method on your temporary table, then you will need to modify it slightly to pass through a reference to our populated temporary table.
// Use this pattern instead
public static TempTable find(AccountNum _accountNum, TempTable _tempTable, boolean _forUpdate = false)
{
if (_accountNum)
{
_tempTable.selectForUpdate(_forUpdate);
select firstonly _tempTable
where _tempTable.AccountNum == _accountNum;
}
return _tempTable;
}
Some examples of populating and using temporary tables can be found in Image:TRG TempTablesGeneral.xpo project.
[edit] Creating temporary tables
[edit] In the AOT
Set the Temporary property to Yes to create a table which will always be temporary.
Note that any existing data will be permanently deleted if you do this!
Of course, you can no longer use the Table Browser to check the data, as the data is stored only per scoped instance of this table.
[edit] Making an existing table temporary
You can convert a normal table to a temporary table in code. For example, if you wish to create a temporary copy of the inventory table:
InventTable inventTable;
;
inventTable.setTmp();
Doing so will remove all data from the temporary copy of the table. If you wish to create a populated temporary copy of a standard table, you can do the following:
InventTable inventTable;
InventTable inventTableTmp;
;
inventTableTmp.setTmp();
while select inventTable
{
inventTableTmp.data(inventTable.data());
inventTableTmp.doInsert();
}
You can now add, modify or delete data from the table without affecting the real contents stored in the database.
[edit] Temporary tables in forms
Using temporary tables in forms requires the use of the .setTmpData() method.
For example:
The temporary table data is populated in a static class method (running server side), which is called from the form and returns the populated table. We could populate a form-level buffer with the temporary data if needed, or else just call the populating method directly from the setTmpData() call as shown below.
In the form datasource init(), we use .setTmpData() to instruct the datasource query to use our temporary table. Our datasource name in this example is TempTable.
public void init()
{
super();
TempTable.setTmpData(tmpTableClass::populateTmpData());
}
See Image:TRG TempTablesForm.xpo for an example of a working form based on a temporary table.
It is also possible to add a table to a form which is not a temporary table, but the data that is shown must be temporary. Compared to the previous example there are not a lot of changes; just make sure the table is made temporary using .setTmp(). As in the previous example the temporary table data is populated in a static class method (running server side), which is called from the form and returns the populated table.
In the following example the InventTable is used.
public void init()
{
super();
InventTable.setTmp();
InventTable.setTmpData(InventTableClass::populateTmpData());
}
[edit] Temporary tables in reports
The correct method of using temporary tables in reports is slightly different from that of forms.
The most important difference is the use of .setRecord() instead of .setTmpData(). A simple example follows:
public boolean fetch()
{
boolean ret;
;
this.queryRun().setRecord(tmpTableClass::populateTmpData());
ret = super();
return ret;
}
As there is often already a supporting RunBaseReport class being used to run the report, it is easy to integrate the population of the temporary data into that existing class. This is particularly useful if you need the data in the temporary table to be dependent on information entered into the report dialog prompt by the user.
See Image:TRG TempTablesReports.xpo for an example of using a RunBaseReport class to run a report based on a temporary table.
[edit] Temporary table performance
Data being stored in temporary tables is stored in a temporary physical file in the file system. The file itself is created when the first record is being inserted in that particular instance of the temporary table. Hence, in a 3 tier environment, the file will be maintained on server or client side, depending on where the first record is inserted. From a performance standpoint this is a concern when using temporary tables.
[edit] Indexes on temporary tables
As with normal tables, indexes can be created on temporary tables. When a temporary copy of a normal table is used with .setTmp(), then the existing indexes will also be created on the temporary version. For new temporary tables (with the Temporary property set to Yes), you must create any desired indexes through the AOT in the normal way.
Indexes have a substantial effect on temporary table performance. For temporary tables with a lot of records you will experience major performance limitations when searching on non-indexed fields.
[edit] Security on temporary tables
You can assign a SecurityKey to a temporary table, like any other. The security key will work well, limiting access. However, temporary tables never show up in the tree for assigning permissions, so it's not possible to actually enable them for users. Therefore it's important not to put a security key on any temporary table or users will never be able to use it.
[edit] Database transactions (tts) on temporary tables
Temporary tables are not included in Dynamics Ax's normal transaction processing capabilities. If you include population of a temporary table inside a ttsBegin/ttsCommit which then aborts, changes made to the temporary table will not be aborted.
To activate transaction capabilities on temporary tables, use the local ttsBegin and ttsCommit methods on the temporary table buffer themselves. These work as expected.
Macros - Definitions and Pitfalls
The X++ language features a macro expansion facility. With it, you can define macros, use macro values, do conditional compilation etc. In this blog I'll describe the semantics of the constructs and provide some guidance to resolve some of the problems beginners and experts alike are having with this language feature.
Macros are unstructured in that they are not defined by the grammar of the language. The handling of macros takes place before the text reaches the compiler.
Macros may appear inside methods and class declarations anywhere that white space is permitted, and may also appear after the ending } in class definitions.
The semantics of each of the macro keywords are described below:
Macro constructs
#define
The syntax is
#define.MyName(SomeValue)
This defines a macro called MyName with the value SomeValue. When this definition is in effect, any references to #MyName will be replaced with the character sequence SomeValue. The definition has no other semantics aside from defining the symbol MyName: The text does not reach the compiler itself. When the compilation of the current method is over, the symbol (MyName in this case) is no longer remembered. If the symbol is already defined, the old value is discarded and replaced by the new value.
#globaldefine
The syntax is
#globaldefine.MyName(SomeValue)
This has the same semantics as #define, described above.
#definc
The syntax is
#definc.MyName
This macro construct is used mainly when the value is a integer value. The preprocessor will increment the value of the symbol by one. If the value was not defined before the #definc occurs, an error is issued by the compiler. If the value before the #definc is not an integer, the old value will be overwritten with the value 0 and then incremented, yielding the value 1.
#defdec
The syntax is
#defdec.MyName
This macro construct is used mainly when the value is a integer value. The preprocessor will decrement the value of the symbol by one. If the value was not defined before the #defdec occurs an error is issued by the compiler. If the value before the #defdec is not an integer, the old value will be overwritten with the value 0 and then decremented, yielding the value -1.
#undef
The syntax is
#undef.MyName
The effect of this is to remove the symbol MyName from the list of current macro definitions. It is not considered an error to remove a symbol that has not previously been #defined.
#if ... #endif
The syntax is
#if.MySymbol
…
#endif
Or
#if.MySymbol(SomeValue)
…
#endif
In the first case the textual content marked with … in the examples above is inserted into the source stream if MySymbol has previously been defined. In the second case, the content is inserted into the source stream if and only if the symbol is defined and has the indicated value.
The #if constructs may be nested to any level but there is no #else construct.
#ifnot ... #endif
The syntax is
#ifnot.MySymbol
…
#endif
Or
#ifnot.MySymbol(SomeValue)
…
#endif
In the first case the textual content marked with … in the examples above is inserted into the source stream if MySymbol has not been defined. In the second case, the content is inserted into the source stream if the symbol is not defined or is defined but does not have the indicated value.
The #if constructs may be nested to any level. There is no #else construct.
#macrolib
The syntax is
#macrolib.MyName
The name must denote a node in the macros branch of the AOT. The text in that node is processed by the preprocessor. The net effect is to insert the content of the named macro in the source text where the directive appears. It is an error if the node is not found in the macros branch in the AOT.
#macro / #localmacro
The keywords #macro and #localmacro are interchangeable; there is no difference in the semantics of the two. This construct is used to define a symbol to denote textual content possibly spanning several lines.
The syntax is
#localmacro.MySymbol
….
#endmacro
Example:
class MyBaseClass extends Runbase
{
int v1;
#define.myMacro(“Hello world”)
#localmacro.currentlist
v1
#endmacro
public container pack()
{
return [#currentlist]; // #currentlist expands to v1
}
public void run()
{
print #myMacro; // #myMacro expands to “Hello world”
}
}
class MyDerivedClass extends myBaseClass
{
int v2;
#localmacro.currentlist
v2
#endmacro
public container pack()
{
return [super(), #currentlist]; // #currentlist expands to v2
}
public void run()
{
print #myMacro; // #myMacro expands to “Hello world”
}
}
#MySymbol
The syntax is
#MySymbol
This inserts the value of the symbol into the source stream. It is an error to refer to a symbol that has not been defined.
If the name denotes a node in the macros branch of the AOT, the text in that node is processed by the preprocessor (in this case #MySymbol is a shorthand for #macrolib.MySymbol).
Common Problems
In this part of the blog post, I'd like to describe some of the problems programmers have when dealing with macros.
Macro parameters
It seems to be a little known fact and a source of some confusion that macros can be parametrized: Values can be given to the % placeholders at the macro expansion site. Simple textual substitution of the positional parameter with the given, actual parameter then takes place. If no parameter is supplied, the empty string is used. So
#define.MyString("Hello World from %1")
will define a named macro (MyString) with one parameter. If that macro is expanded as shown below:
#MyString(X++)
the resulting string will be
"Hello World from X++"
Note that the place of expansion did not supply the letters X++ inside quotes. That would have generated a compiletime error:
#MyString("X++")
would have generated
"Hello World from "X++""
That is what is meant by simple string substitution.
The confusion can also occur because the % notation is also used for parameter substitution in the strFmt string formatting function. As you know, this function has a variable length parameter list, and each reference of %n in the first argument (a string) will be expanded to contain a textual representation of the n'th argument, as shown below:
print strfmt("The value is %1", theValue);
Now, some programmers have been known to want to specify the first argument, i.e. the string containing the substitutions, with a macro symbol:
#define.TheText("The value is %1")
print strfmt(#TheText, theValue);
But, the macro substition kicks in before the compiler sees the source code. The macro substition engive will not find a parameter to place where the %1 is, so the compiler will see:
print strfmt("The value is ", theValue);
which is probably not what the programmer intended.
Macros in class declarations
Some confusion stems from the situation where macros are defined in class declarations. In order to understand how this is handled it is useful to review what the compiler does when it compiles a method. It starts by calculating the sequence of class derivations that the class is part of. It then parses each of the class declarations with the least derived one first, filling its internal symbol table with the macros as it goes along. After compiling the most local class declaration (the most derived one) the compiler compiles the method itself. Any symbol defined in any of the class declarations will subsequently be available for use in the methods. Symbols defined in a class declaration may be replaced by values defined in more derived class declarations.
Parenthesis in macro strings
The scanner dealing with macro strings is quite simple minded. It will not handle the situation where closing parenthesis characters are included in the string. So,
#define.Another("(This is text in parenthesis)")
will generate a compiler lexical error. If you need to do this, you should use the #localmacro directive instead:
#localmacro.Another
"(This is text in parenthesis)"
#endmacro
In this context the end of the macro is signalled by the #endmacro string, not a right parenthesis.
Macros are unstructured in that they are not defined by the grammar of the language. The handling of macros takes place before the text reaches the compiler.
Macros may appear inside methods and class declarations anywhere that white space is permitted, and may also appear after the ending } in class definitions.
The semantics of each of the macro keywords are described below:
Macro constructs
#define
The syntax is
#define.MyName(SomeValue)
This defines a macro called MyName with the value SomeValue. When this definition is in effect, any references to #MyName will be replaced with the character sequence SomeValue. The definition has no other semantics aside from defining the symbol MyName: The text does not reach the compiler itself. When the compilation of the current method is over, the symbol (MyName in this case) is no longer remembered. If the symbol is already defined, the old value is discarded and replaced by the new value.
#globaldefine
The syntax is
#globaldefine.MyName(SomeValue)
This has the same semantics as #define, described above.
#definc
The syntax is
#definc.MyName
This macro construct is used mainly when the value is a integer value. The preprocessor will increment the value of the symbol by one. If the value was not defined before the #definc occurs, an error is issued by the compiler. If the value before the #definc is not an integer, the old value will be overwritten with the value 0 and then incremented, yielding the value 1.
#defdec
The syntax is
#defdec.MyName
This macro construct is used mainly when the value is a integer value. The preprocessor will decrement the value of the symbol by one. If the value was not defined before the #defdec occurs an error is issued by the compiler. If the value before the #defdec is not an integer, the old value will be overwritten with the value 0 and then decremented, yielding the value -1.
#undef
The syntax is
#undef.MyName
The effect of this is to remove the symbol MyName from the list of current macro definitions. It is not considered an error to remove a symbol that has not previously been #defined.
#if ... #endif
The syntax is
#if.MySymbol
…
#endif
Or
#if.MySymbol(SomeValue)
…
#endif
In the first case the textual content marked with … in the examples above is inserted into the source stream if MySymbol has previously been defined. In the second case, the content is inserted into the source stream if and only if the symbol is defined and has the indicated value.
The #if constructs may be nested to any level but there is no #else construct.
#ifnot ... #endif
The syntax is
#ifnot.MySymbol
…
#endif
Or
#ifnot.MySymbol(SomeValue)
…
#endif
In the first case the textual content marked with … in the examples above is inserted into the source stream if MySymbol has not been defined. In the second case, the content is inserted into the source stream if the symbol is not defined or is defined but does not have the indicated value.
The #if constructs may be nested to any level. There is no #else construct.
#macrolib
The syntax is
#macrolib.MyName
The name must denote a node in the macros branch of the AOT. The text in that node is processed by the preprocessor. The net effect is to insert the content of the named macro in the source text where the directive appears. It is an error if the node is not found in the macros branch in the AOT.
#macro / #localmacro
The keywords #macro and #localmacro are interchangeable; there is no difference in the semantics of the two. This construct is used to define a symbol to denote textual content possibly spanning several lines.
The syntax is
#localmacro.MySymbol
….
#endmacro
Example:
class MyBaseClass extends Runbase
{
int v1;
#define.myMacro(“Hello world”)
#localmacro.currentlist
v1
#endmacro
public container pack()
{
return [#currentlist]; // #currentlist expands to v1
}
public void run()
{
print #myMacro; // #myMacro expands to “Hello world”
}
}
class MyDerivedClass extends myBaseClass
{
int v2;
#localmacro.currentlist
v2
#endmacro
public container pack()
{
return [super(), #currentlist]; // #currentlist expands to v2
}
public void run()
{
print #myMacro; // #myMacro expands to “Hello world”
}
}
#MySymbol
The syntax is
#MySymbol
This inserts the value of the symbol into the source stream. It is an error to refer to a symbol that has not been defined.
If the name denotes a node in the macros branch of the AOT, the text in that node is processed by the preprocessor (in this case #MySymbol is a shorthand for #macrolib.MySymbol).
Common Problems
In this part of the blog post, I'd like to describe some of the problems programmers have when dealing with macros.
Macro parameters
It seems to be a little known fact and a source of some confusion that macros can be parametrized: Values can be given to the %
#define.MyString("Hello World from %1")
will define a named macro (MyString) with one parameter. If that macro is expanded as shown below:
#MyString(X++)
the resulting string will be
"Hello World from X++"
Note that the place of expansion did not supply the letters X++ inside quotes. That would have generated a compiletime error:
#MyString("X++")
would have generated
"Hello World from "X++""
That is what is meant by simple string substitution.
The confusion can also occur because the % notation is also used for parameter substitution in the strFmt string formatting function. As you know, this function has a variable length parameter list, and each reference of %n in the first argument (a string) will be expanded to contain a textual representation of the n'th argument, as shown below:
print strfmt("The value is %1", theValue);
Now, some programmers have been known to want to specify the first argument, i.e. the string containing the substitutions, with a macro symbol:
#define.TheText("The value is %1")
print strfmt(#TheText, theValue);
But, the macro substition kicks in before the compiler sees the source code. The macro substition engive will not find a parameter to place where the %1 is, so the compiler will see:
print strfmt("The value is ", theValue);
which is probably not what the programmer intended.
Macros in class declarations
Some confusion stems from the situation where macros are defined in class declarations. In order to understand how this is handled it is useful to review what the compiler does when it compiles a method. It starts by calculating the sequence of class derivations that the class is part of. It then parses each of the class declarations with the least derived one first, filling its internal symbol table with the macros as it goes along. After compiling the most local class declaration (the most derived one) the compiler compiles the method itself. Any symbol defined in any of the class declarations will subsequently be available for use in the methods. Symbols defined in a class declaration may be replaced by values defined in more derived class declarations.
Parenthesis in macro strings
The scanner dealing with macro strings is quite simple minded. It will not handle the situation where closing parenthesis characters are included in the string. So,
#define.Another("(This is text in parenthesis)")
will generate a compiler lexical error. If you need to do this, you should use the #localmacro directive instead:
#localmacro.Another
"(This is text in parenthesis)"
#endmacro
In this context the end of the macro is signalled by the #endmacro string, not a right parenthesis.
Saturday, 6 October 2007
At this time, my leader tell me do a research to write an application using Facebook framework. So interesting but i face with a problem that in order to write an facebook app you must has one server public in internet. Ohh. This is my big problem, I in a circle with a question that "how to display" your data in your canvas. All the things i've done is just in local webserver which call service from Facebook :D.
Haha
Haha
Friday, 27 July 2007
Enable and Disable Ubuntu Root Password
Ubuntu is one of the few Linux distributions out there that will not enable the root account.If you want to do something with root permission on the console you have to type sudo before the command.
sudo” means superuser do. “sudo” will prompt for “Password:”. Please specify user password
As you have noticed during the Ubuntu installation there was no question about the root password, as you might have been used to see during other Linux distribution installation process.Because of this your root accout is inactive.
If you want to enable root account (which is not recommended) enter the following command.
$sudo passwd root
This will prompt for a new root password and once you confirm it, you can start using the root account to login.
If you want to disable root account in ubuntu you need to lock the root account by using the following command
$sudo passwd -l root
If you want to work on a root console you’d better use the following command
$sudo -i
sudo” means superuser do. “sudo” will prompt for “Password:”. Please specify user password
As you have noticed during the Ubuntu installation there was no question about the root password, as you might have been used to see during other Linux distribution installation process.Because of this your root accout is inactive.
If you want to enable root account (which is not recommended) enter the following command.
$sudo passwd root
This will prompt for a new root password and once you confirm it, you can start using the root account to login.
If you want to disable root account in ubuntu you need to lock the root account by using the following command
$sudo passwd -l root
If you want to work on a root console you’d better use the following command
$sudo -i
Install .rpm Files in Ubuntu
Some time you might find some applications are having only .rpm files but you want a .deb package for your debian,Ubuntu and other debian derived ditributions.If you can’t find .deb debian package in any of the debian,ubuntu repositories or elsewhere, you can use the alien package converter to install the .rpm file.
Alien is a program that converts between the rpm, dpkg, stampede slp, and slackware tgz file formats. If you want to use a package from another distribution than the one you have installed on your system, you can use alien to convert it to your preferred package format and install it.
Despite the large version number, alien is still (and will probably always be) rather experimental software. It has been used by many people for many years, but there are still many bugs and limitations.
Alien should not be used to replace important system packages, like sysvinit, shared libraries, or other things that are essential for the functioning of your system. Many of these packages are set up differently by Debian and Red Hat, and packages from the different distributions cannot be used interchangably. In general, if you can’t uninstall the package without breaking your system, don’t try to replace it with an alien version.
Install alien in Ubuntu
sudo apt-get install alien
(In order to use apt-get command to install a program into your computer, your computer must has an internet connection.)
This will install all the required packages.Now you can start converting your .rpm files to .deb packages.
Available Options for alien
Convert the package.rpm into a package.deb
sudo alien -d package-name.rpm
Convert the package.rpm into a package.deb, and install the generated package.
sudo alien -i package-name.rpm
If you want to keeps alien from changing the version number use the following command
sudo alien -k rpm-package-file.rpm
Example
Suppose we have a avg antivirus avg71lms-r30-a0782.i386.rpm file
To convert .rpm to debian
sudo alien -k avg71lms-r30-a0782.i386.rpm
Now you should be having avg71lms-r30-a0782.i386.deb file
To install .deb file
sudo dpkg -i avg71lms-r30-a0782.i386.deb
If you don’t use -k option you should see avg71lms_r30-1_i386.deb file the difference is it will add 1
Source: http://www.ubuntugeek.com
Alien is a program that converts between the rpm, dpkg, stampede slp, and slackware tgz file formats. If you want to use a package from another distribution than the one you have installed on your system, you can use alien to convert it to your preferred package format and install it.
Despite the large version number, alien is still (and will probably always be) rather experimental software. It has been used by many people for many years, but there are still many bugs and limitations.
Alien should not be used to replace important system packages, like sysvinit, shared libraries, or other things that are essential for the functioning of your system. Many of these packages are set up differently by Debian and Red Hat, and packages from the different distributions cannot be used interchangably. In general, if you can’t uninstall the package without breaking your system, don’t try to replace it with an alien version.
Install alien in Ubuntu
sudo apt-get install alien
(In order to use apt-get command to install a program into your computer, your computer must has an internet connection.)
This will install all the required packages.Now you can start converting your .rpm files to .deb packages.
Available Options for alien
Convert the package.rpm into a package.deb
sudo alien -d package-name.rpm
Convert the package.rpm into a package.deb, and install the generated package.
sudo alien -i package-name.rpm
If you want to keeps alien from changing the version number use the following command
sudo alien -k rpm-package-file.rpm
Example
Suppose we have a avg antivirus avg71lms-r30-a0782.i386.rpm file
To convert .rpm to debian
sudo alien -k avg71lms-r30-a0782.i386.rpm
Now you should be having avg71lms-r30-a0782.i386.deb file
To install .deb file
sudo dpkg -i avg71lms-r30-a0782.i386.deb
If you don’t use -k option you should see avg71lms_r30-1_i386.deb file the difference is it will add 1
Source: http://www.ubuntugeek.com
Wednesday, 25 July 2007
Password vulnerability in Firefox 2.0.0.5
By Joe Barr on July 23, 2007 (2:45:00 PM)
According to a message posted over the weekend on the Full-Disclosure mailing list, the latest version of Firefox, 2.0.0.5, contains a password management vulnerability that can allow malicious Web sites to steal user passwords. If you have JavaScript enabled and allow Firefox to remember your passwords, you are at risk from this flaw.
The Mozilla team fixed a similar flaw last November, one which did not require JavaScript. The heise Security Web site contains a demo/proof of concept of the vulnerability risk that you can use to determine your vulnerability.
The original flaw was referred to as reverse cross-site scripting and was reportedly widely used on Myspace.com.
Note: A reader has pointed out that MySpace.com does not allow Javascript, as originally reported. The reader is correct, although there do seem to be workarounds which result in Javascript executing on some browsers.
Discussions between heise Security and Mozilla developers describe a debate among Mozilla developers over removing this feature, since "evil" server pages can steal passwords from browsers whether the user has opted for password management by Firefox or not.
Apple's Safari is vulnerable in the same way. Current workarounds include disabling JavaScript in Firefox or avoiding the use of Firefox password management on sites where users are allowed to post JavaScript pages.
(Source:http://www.linux.com/feature/118166)
Here is my test:


According to a message posted over the weekend on the Full-Disclosure mailing list, the latest version of Firefox, 2.0.0.5, contains a password management vulnerability that can allow malicious Web sites to steal user passwords. If you have JavaScript enabled and allow Firefox to remember your passwords, you are at risk from this flaw.
The Mozilla team fixed a similar flaw last November, one which did not require JavaScript. The heise Security Web site contains a demo/proof of concept of the vulnerability risk that you can use to determine your vulnerability.
The original flaw was referred to as reverse cross-site scripting and was reportedly widely used on Myspace.com.
Note: A reader has pointed out that MySpace.com does not allow Javascript, as originally reported. The reader is correct, although there do seem to be workarounds which result in Javascript executing on some browsers.
Discussions between heise Security and Mozilla developers describe a debate among Mozilla developers over removing this feature, since "evil" server pages can steal passwords from browsers whether the user has opted for password management by Firefox or not.
Apple's Safari is vulnerable in the same way. Current workarounds include disabling JavaScript in Firefox or avoiding the use of Firefox password management on sites where users are allowed to post JavaScript pages.
(Source:http://www.linux.com/feature/118166)
Here is my test:


Linux Foundation names new CTO
By Joe 'Zonker' Brockmeier on July 25, 2007 (12:00:00 AM)
The Linux Foundation today announced Markus Rex will become its new Chief Technology Officer (CTO) and lead its Linux Standard Base (LSB) initiative and other standardization and technical initiatives for the foundation.
In an email interview, Rex said that he began using Linux in 1992. He joined SUSE in 1999 and ran engineering for five years before SUSE was purchased by Novell. After the acquisition, he served as vice president and general manager for SUSE Linux, and as CTO for Novell's Open Platform Solutions Group.
Rex has been involved with the foundation for some time. "For the last three years I was a member of the board of directors for both predecessor organizations, the Free Standards Group and OSDL, and up to today also a board member for the Linux Foundation. For many years I followed the standardization efforts in Linux, also by actively directing SUSE and Novell to always certify its products and make successful LSB certification a product requirement."
The primary job facing Rex is heading up the LSB. When asked about his plans for the LSB, Rex says one of his goals is "to increase the adoption of LSB by application vendors." He says that adoption by Linux vendors is "solid," but "ISVs are still looking for broader scope. I plan to provide that to allow more applications to be LSB-compliant."
To do that, Rex says that the foundation needs to "include additional libraries and interfaces, so more application use-cases are covered by the LSB.
"Our tools and documentation for developers need to increase in volume and scope, and we have to make it really easy to validate conformance. Our project with the Russian Academy of Science to create a sophisticated test framework is an important step in that direction and lays the foundation for other improvements."
Rex says that the LSB is vitally important. "We have to prevent Linux from fragmenting like Unix did, and the LSB is a critical component to help with that."
As CTO, Rex says that his job will be to lead "all technical initiatives for the Linux Foundation," which includes the LSB as well as efforts like the open printing workgroup. He also says he will be "the primary technical interface to LF members and the LF's Technical Advisory Board who represent the kernel community."
The CTO position has a limited tenure. Rex is slated to end his term in 2008 and return to Novell at that time, according to the release from the Linux Foundation.
Previous CTO Ian Murdock joined Sun Microsystems in March, and has been working on Project Indiana -- an objective to make Sun's OpenSolaris more like Linux.
(Source:http://www.linux.com/feature/118212)
The Linux Foundation today announced Markus Rex will become its new Chief Technology Officer (CTO) and lead its Linux Standard Base (LSB) initiative and other standardization and technical initiatives for the foundation.
In an email interview, Rex said that he began using Linux in 1992. He joined SUSE in 1999 and ran engineering for five years before SUSE was purchased by Novell. After the acquisition, he served as vice president and general manager for SUSE Linux, and as CTO for Novell's Open Platform Solutions Group.
Rex has been involved with the foundation for some time. "For the last three years I was a member of the board of directors for both predecessor organizations, the Free Standards Group and OSDL, and up to today also a board member for the Linux Foundation. For many years I followed the standardization efforts in Linux, also by actively directing SUSE and Novell to always certify its products and make successful LSB certification a product requirement."
The primary job facing Rex is heading up the LSB. When asked about his plans for the LSB, Rex says one of his goals is "to increase the adoption of LSB by application vendors." He says that adoption by Linux vendors is "solid," but "ISVs are still looking for broader scope. I plan to provide that to allow more applications to be LSB-compliant."
To do that, Rex says that the foundation needs to "include additional libraries and interfaces, so more application use-cases are covered by the LSB.
"Our tools and documentation for developers need to increase in volume and scope, and we have to make it really easy to validate conformance. Our project with the Russian Academy of Science to create a sophisticated test framework is an important step in that direction and lays the foundation for other improvements."
Rex says that the LSB is vitally important. "We have to prevent Linux from fragmenting like Unix did, and the LSB is a critical component to help with that."
As CTO, Rex says that his job will be to lead "all technical initiatives for the Linux Foundation," which includes the LSB as well as efforts like the open printing workgroup. He also says he will be "the primary technical interface to LF members and the LF's Technical Advisory Board who represent the kernel community."
The CTO position has a limited tenure. Rex is slated to end his term in 2008 and return to Novell at that time, according to the release from the Linux Foundation.
Previous CTO Ian Murdock joined Sun Microsystems in March, and has been working on Project Indiana -- an objective to make Sun's OpenSolaris more like Linux.
(Source:http://www.linux.com/feature/118212)
Saturday, 21 July 2007
Who will be the winner?

Who will be the winner of the Vietnam-Iraq match?
Last day, my answer was Vietnam, but today, after reading the article about Iraq, I don't care the result. If our team win, our country will very happy. But if Iraq win, they do a great thing. All of them come from a country in war. The war destroy their country day by day. And they play football but they don't know whenever they alive or die.
FIFA goal program help Iraq construct their sports infrastructure, but the values of 300.000 USD each year is not enough. Iraq was a reach country. But war destroyed all. So sad.
I hope the result will be 1-1 and Vietnam win with a gold score of Cong Vinh at extra time.
Subscribe to:
Posts (Atom)